By: Shelby McCullough| Published: September 8, 2026
Yes, the root flare should be visible above the soil line, not buried under mulch or dirt. If yours is covered, start by pulling back mulch by hand and checking for girdling roots close to the trunk. For mature trees, visible decay, or anything near a structure, call a certified arborist before you dig any further.
TL;DR:
- Exposing the root flare during dormancy and avoiding root cutting near the trunk prevents structural instability and decay risks.
- Use gentle tools like brushes or compressed air for excavation and never re-bury the flare to avoid suffocation and long-term damage.
- Large trees or those with visible decay, fungi, or extensive girdling roots require professional assessment and intervention by certified arborists.
- Recheck mulch depth and soil level annually, especially after landscaping or grading work, to prevent flare burial from erosion or soil buildup.
- Recognize signs like mushrooms, soft bark, or cracks at the base as indicators of decay that necessitate professional evaluation rather than DIY measures.
Table of Contents
- What Is Root Flare Exposure and Why Does It Matter?
- How to Safely Expose a Buried Root Flare
- Tools, Safety, and Methods That Backfire
- When to Call a Certified Arborist
- Aftercare: Mulch, Watering, and Ongoing Checks
- Common Mistakes and a Quick Checklist
- How Soil Erosion and Planting Depth Set Up Flare Problems
- Do Different Tree Species Need Different Approaches?
- Keeping the Flare Visible for Good
- Beyond Girdling Roots: Other Warning Signs at the Base
- What Happens When Root Flare Exposure Goes Wrong
- A Certified Arborist’s Field Notes on Root Flare Work
- McCullough Tree Service Handles Root Collar Excavation the Right Way
- Where to Learn More
- Sources
What Is Root Flare Exposure and Why Does It Matter?
The root flare, sometimes called the root collar, is the point where the trunk widens and transitions into the main structural roots. It should sit right at or slightly above grade, like the base of a wine glass sitting on a table rather than sunk into it. That transition zone handles gas exchange for the lower trunk and supports the phloem tissue that moves sugars down to the roots.
Bury it under soil or a thick mulch mound, and that tissue suffocates slowly. Common indicators of a buried flare include stunted growth, yellowing leaves, dead limbs, and decay right at the base of the trunk, according to Penn State Extension. Moisture gets trapped against bark that was never meant to stay wet, and that damp, dark environment invites decay fungi such as Phytophthora, Leptographium, and Armillaria to move in. These pathogens work below the soil line where nobody sees them, which is exactly the problem.
A tree can look perfectly fine in the canopy for years while its base quietly rots. Homeowners often miss a buried flare for this reason. The crown stays green, the leaves come in on schedule, and then one storm season the tree goes down with roots that had already failed underground. Watch for mushrooms sprouting at the trunk base, bark that stays damp long after rain, or a trunk that looks like a telephone pole stuck straight into the ground with no visible taper. Any of those is a signal worth acting on.
How to Safely Expose a Buried Root Flare
Timing matters more than most people assume. Root collar excavation is easiest on the tree during the dormant season, roughly late fall through early spring, when the tree isn’t actively pushing new growth and can tolerate root disturbance with less stress. Before you touch a shovel, call 811 or your local utility locator so you’re not excavating into a gas line or buried cable.
Here’s the actual sequence, whether you’re doing this yourself or watching a crew do it:
- Clear the surface mulch. Rake back any mulch, soil, or turf covering the base out to at least the drip line edge closest to the trunk.
- Loosen soil gradually. Work outward from the trunk in a widening circle rather than digging straight down, which protects roots you haven’t found yet.
- Brush away remaining soil by hand. A soft brush, a wooden chopstick, or even compressed air from a shop vacuum on reverse works better than a trowel this close to bark.
- Locate the actual flare. Keep going until you can see the natural widening where trunk becomes root, not just the first root you hit.
- Inspect for girdling roots. These circle around the trunk instead of growing outward, and they choke the tree slowly as both grow in diameter.
- Prune small girdling roots at the turning point, where the root first bends toward the trunk, using clean, sharp hoppers.
- Leave a shallow dish, not a flat surface, so water drains away from the trunk instead of pooling against it.
For anything larger than a young ornamental, compressed-air tools prevent bark damage that a shovel or trowel almost guarantees on a mature specimen. This is where the professional method, known as air spading, earns its reputation. An air spade blasts a jet of compressed air through soil, breaking it up and blowing it away without shearing off the fine feeder roots that a shovel edge slices through blind. It’s the standard approach for root collar work because it exposes the entire root architecture cleanly enough to see every girdling root before you cut anything.
Pro Tip: Never backfill over an exposed flare once you’ve uncovered it, even temporarily. If you need to leave the site, cover the area loosely with burlap instead of soil to protect it from sun exposure without smothering it again.
Tools, Safety, and Methods That Backfire
A soft-bristle brush, a wooden or plastic root pick, and a low-pressure garden hose handle most home excavation jobs without hurting bark or fine roots. A leaf blower on a low setting can clear loose, dry soil fast once the bulk of the digging is done.
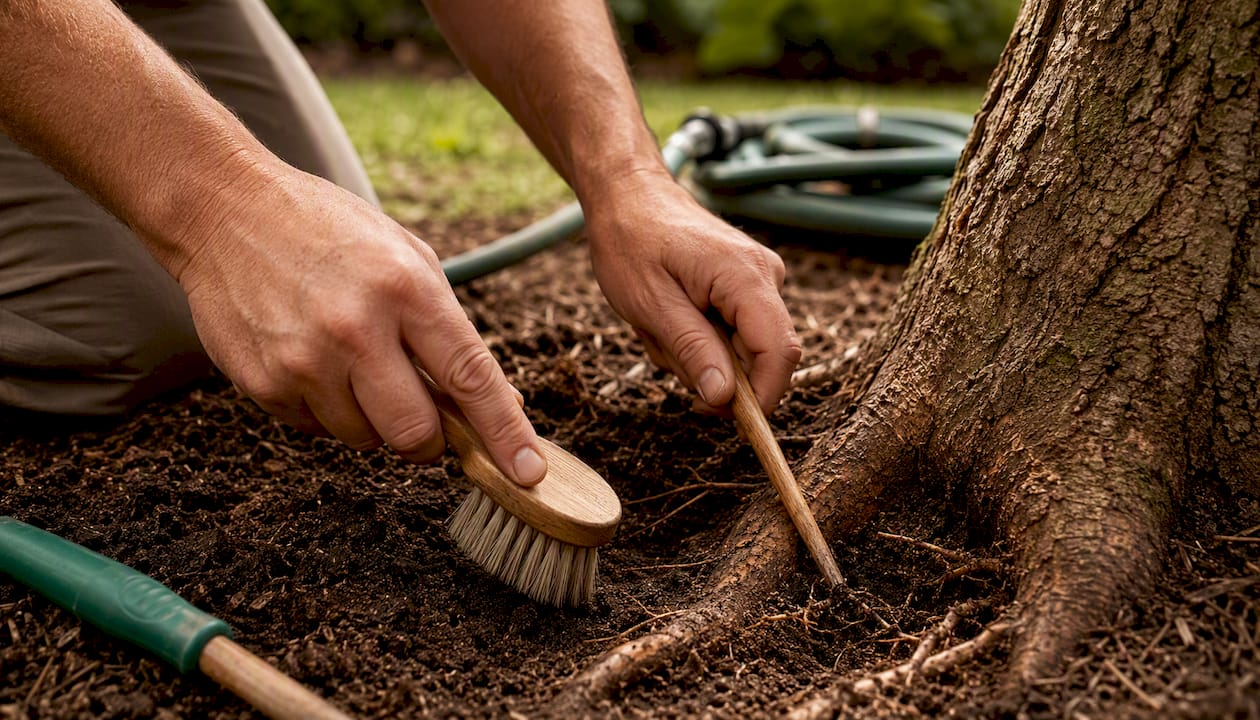
Skip the power washer. High-pressure water strips bark and can drive water into wounds you haven’t noticed yet. Skip aggressive digging with a full-size shovel near the trunk, too. This is exactly where air spade excavation outperforms hand tools on anything beyond a small tree, since compressed air separates soil from roots without cutting either.
A few safety basics apply regardless of tool choice:
- Call 811 before digging near foundations, driveways, or utility easements.
- Never cut a root thicker than an inch without knowing whether it’s a structural anchor.
- Wear eye protection and gloves; flying soil and sharp root ends cause more injuries than people expect.
- Stop immediately if the tree shows any lean or the soil around the base feels unstable underfoot.
When to Call a Certified Arborist
Some situations call for a professional, full stop. If the tree is large, has visible fungal growth at the base, shows extensive girdling roots wrapped multiple times around the trunk, or stands close enough to a house or driveway that failure would cause real damage, bring in help before you dig further.
A qualified arborist typically handles the job this way:
- Air-spade excavation to expose the entire root collar without root damage
- Identification and pruning of girdling roots, prioritizing which ones threaten structural stability
- A risk assessment covering decay extent, lean, and canopy health
- Written follow-up recommendations, including whether the tree can recover or should come down
Look for ISA certification and proof of liability insurance before hiring anyone for this kind of work. Root collar excavation on a mature tree is not a place to gamble on an uninsured crew with a shovel.
Aftercare: Mulch, Watering, and Ongoing Checks
Once the flare is exposed, the job isn’t over. What you do in the following weeks decides whether it stays exposed or gets buried again by the next bag of mulch.
- Apply mulch in a donut shape, never a volcano piled against the trunk.
- Keep total mulch depth at 2 to 4 inches, tapering to nothing within a few inches of the bark.
- Skip heavy topsoil to “smooth things out.” Light, shredded mulch stabilizes the area without recreating the burial problem.
- Water at the drip line, not directly against the trunk, to avoid recreating the damp conditions that invited rot in the first place.
- Recheck every season, especially after landscaping crews mulch nearby beds, since re-burial happens gradually and nobody notices until the flare disappears again.
A wide, shallow mulch ring kept a few inches off the bark does more for long-term flare health than almost anything else on this list. For a deeper look at proper technique, McCullough’s guide on mulching in tree care covers seasonal adjustments worth knowing.
Common Mistakes and a Quick Checklist
Most root flare damage traces back to a small handful of repeated errors, not bad luck.
- Piling mulch into a volcano shape against the trunk, which is the single most common cause of buried flares in residential landscapes.
- Re-burying the flare with topsoil “to even out the yard” after a grading project.
- Cutting major structural roots without knowing which ones anchor the tree.
- Backfilling aggressively around a newly planted tree instead of setting it 1 to 2 inches above final grade.
| Do | Don’t |
|---|---|
| Keep mulch 2 to 4 inches deep | Pile mulch against the trunk |
| Excavate gently, working outward | Dig straight down near the base |
| Prune small girdling roots at the bend | Cut major structural roots blind |
| Call 811 before digging | Assume there’s nothing buried |
| Hire an ISA-certified arborist for large trees | DIY excavation on trees near structures |
| Recheck mulch depth every season | Forget about it once it’s exposed |
If a tree’s canopy keeps declining after you’ve corrected the flare, that’s a sign of deeper decay and worth a professional risk assessment rather than more DIY troubleshooting.
How Soil Erosion and Planting Depth Set Up Flare Problems
Two very different forces bury root flares, and they call for different fixes. Erosion happens gradually as rain, irrigation runoff, or grading work carries soil downhill and deposits it around tree bases, often without anyone noticing until the flare has vanished under several inches of new dirt.
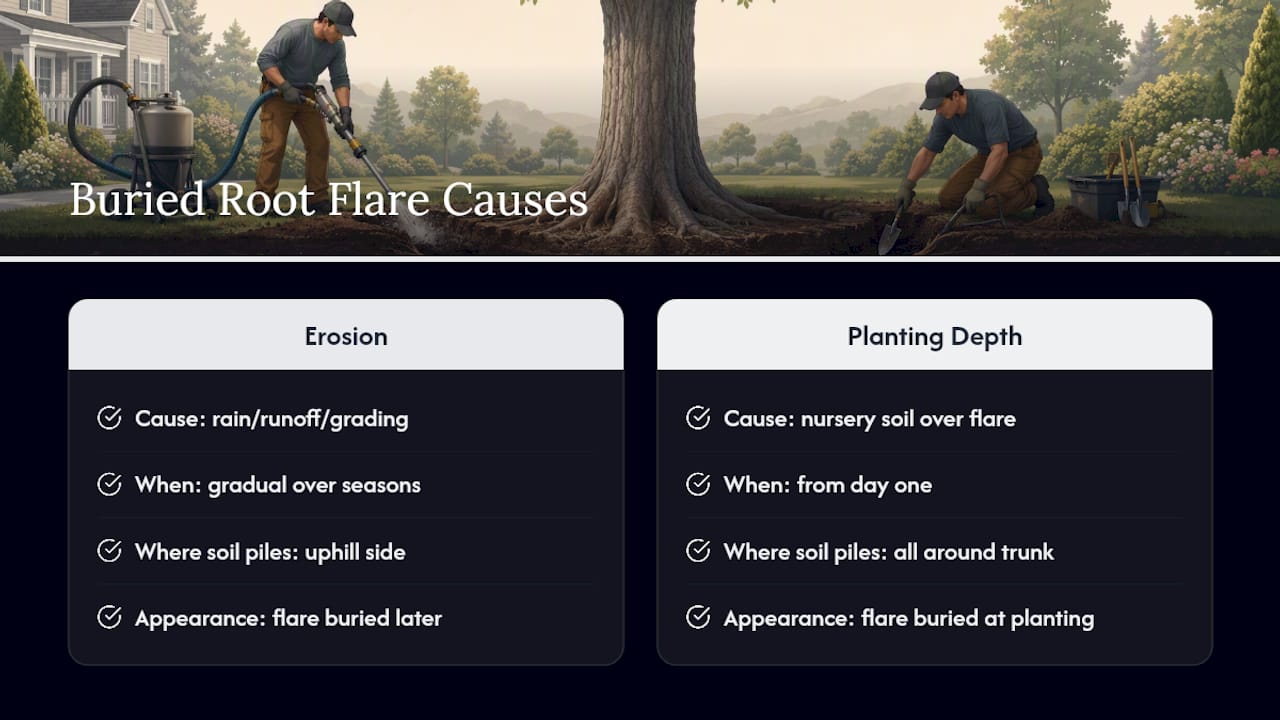
Planting depth is the opposite problem: the tree arrives buried from day one. Nursery stock is frequently potted or balled with soil piled over the actual flare, and if that tree goes into the ground at the same depth it came in, the burial problem is baked in before the tree ever takes root. Setting the root flare 1 to 2 inches above final grade when planting accounts for natural settling and keeps the collar from ending up below grade a year later.
Sloped yards compound both problems. A tree planted at the correct depth on a slope can still end up buried within a few seasons as soil washes downhill and collects around the trunk on the uphill side. If you’re planting on any kind of grade, check the flare annually for the first three to five years and be ready to re-excavate the uphill side sooner than you’d expect on flat ground.
Do Different Tree Species Need Different Approaches?
Root flare visibility varies quite a bit by species, and that changes how urgently you need to act. Trees with naturally shallow, wide-spreading root systems, live oaks and many maples among them, tend to show flare problems faster because their roots sit closer to the surface to begin with. Burial hits them harder and sooner.
Species with a more pronounced natural taper, like many pines, sometimes retain a visible flare even under mild burial, which can mask a problem that’s actually present but just harder to spot. That’s not a reason to skip checking pines. It’s a reason to look more carefully, since the visual cue you’d normally rely on is less reliable.
Trees prone to girdling roots in nursery production, certain maples and some ornamental pears among them, deserve extra scrutiny at planting time regardless of species-specific flare visibility. If a tree arrived from the nursery with a rootball that was already circling inside its container, that root architecture doesn’t fix itself once it’s in the ground. It just gets harder to see and correct with each passing year.
Keeping the Flare Visible for Good
Exposing the flare once solves today’s problem. Keeping it exposed for the next ten years is the part most homeowners skip. Landscaping crews who mulch on autopilot are the number one reason a properly excavated flare disappears again within two or three seasons.
Set a seasonal reminder, ideally tied to spring cleanup and fall prep, to walk out and check mulch depth at the base of any tree that’s had flare work done. If a crew or a well-meaning neighbor piles mulch back into a volcano, pull it back the same week rather than letting it sit through a whole growing season.
Grade changes are the other long-term threat. Any nearby construction, new sod installation, or drainage work can shift soil toward a tree’s base without anyone intending it. After any landscaping project within 20 feet of a tree, recheck the flare specifically, not just the general appearance of the bed.
Deep root fertilization can also support recovery once the flare is exposed, since it gets nutrients to the root zone without adding bulk material at the surface. McCullough’s video guide on deep root fertilization walks through how that process supports vigor after excavation work.
Beyond Girdling Roots: Other Warning Signs at the Base
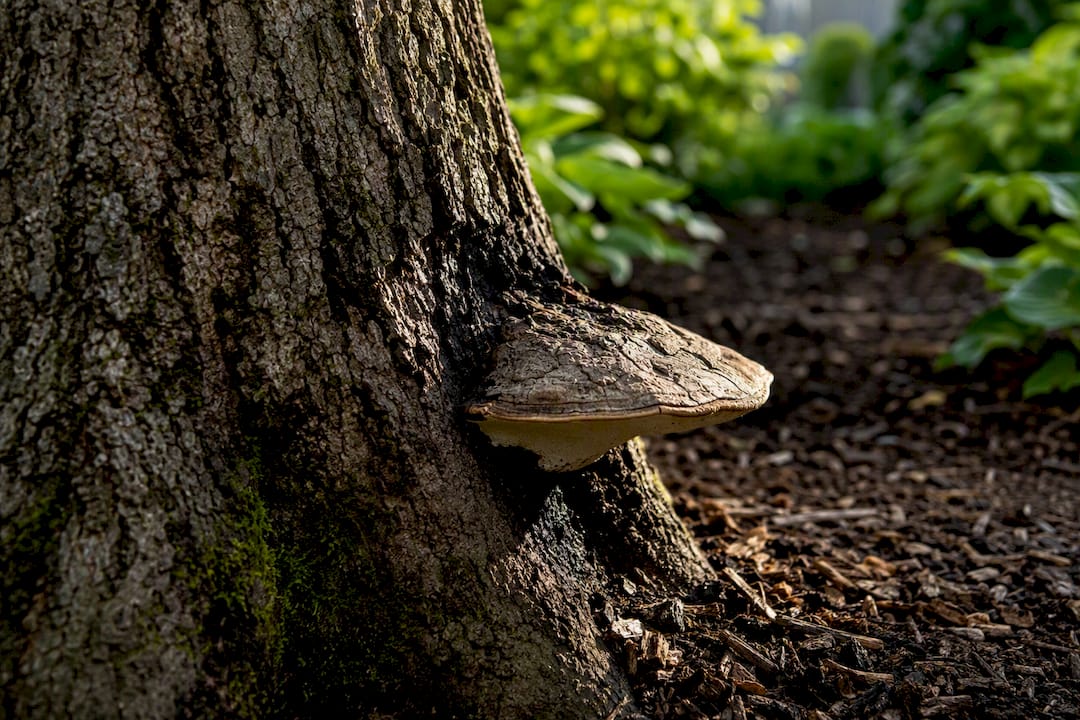
Girdling roots get most of the attention, but they’re not the only thing that shows up once you expose a flare. Fungal conks, the shelf-like growths that indicate active wood decay, are one of the more serious findings, since they mean decay fungi have already established themselves in the heartwood rather than just the surface bark.
Bark that’s soft, spongy, or comes away easily when pressed signals active rot underneath, not just surface weathering. A trunk with vertical cracks radiating from the base, or bark that’s noticeably discolored and darker than the rest of the trunk, both point toward moisture damage that’s been building for a while.
Insect activity at the base, small holes, sawdust-like frass, or visible tunneling, often follows decay rather than causing it. Pests target already-weakened wood, so their presence is frequently a secondary sign that the flare has been compromised for some time. None of these symptoms mean the tree is a lost cause automatically, but all of them push the decision toward a professional risk assessment rather than continued DIY excavation.
What Happens When Root Flare Exposure Goes Wrong
Exposing a flare incorrectly can do real damage, not just fail to help. Aggressive digging that severs major structural roots to “get to the flare faster” can destabilize a tree that was perfectly sound before anyone touched it. Air-spade work should be done by trained operators specifically because it’s possible to expose so much root mass at once that the tree loses its anchoring before anyone realizes what’s happened.
There’s also a timing risk. Excavating during peak summer heat or drought stress adds a second stressor right on top of root exposure, and a tree that could have handled either challenge alone sometimes can’t handle both together. That’s part of why dormant-season timing isn’t just a suggestion. It’s a real buffer against compounding stress.
The reverse problem matters too. When a buried flare traces back to poor nursery practice, meaning the tree was potted too deep from the start, root collar excavation helps but doesn’t always fully reverse the damage, especially if decay has already progressed before anyone caught it. Early intervention gives a much better outcome than catching the problem years in. A tree that’s been declining for a decade because of a buried flare is a different conversation than one caught in its second year.
A Certified Arborist’s Field Notes on Root Flare Work
In the field, non-invasive excavation and early detection consistently produce the best outcomes, before decay sets in or girdling roots reach a critical diameter. Safety for both the tree and the crew comes first on every job. McCullough Tree Service prioritizes assessment before intervention, because the wrong tool in the wrong hands does more harm than a buried flare left alone another season.
— Results
McCullough Tree Service Handles Root Collar Excavation the Right Way
A shovel and good intentions only go so far once girdling roots or early decay are involved. Professional tree service companies bring the assessment and the air-spade equipment that hand-digging simply can’t match, which matters most on mature trees where one wrong cut near the trunk can undo years of growth.

A visit typically starts with an inspection of the base and surrounding grade, followed by air-spade excavation if the flare is buried deep enough to warrant it. From there, the crew identifies and corrects girdling roots, checks for decay or structural risk, and leaves written recommendations you can act on immediately or file away for next season. Professional tree service technicians working on your property carry licensing and insurance consistent with certified arborist standards. If a tree’s decline points toward a bigger structural problem, McCullough’s tree trimming and tree removal services pick up right where root flare work leaves off. Request an inspection through a professional tree service to get a professional read on your tree’s root collar before a small problem becomes an expensive one.
Where to Learn More
- Penn State Extension: detailed signs and consequences of buried root flares.
- UMD Extension: girdling root identification and pruning guidance.
- Colorado State Forest Service: correct planting depth for new trees.
Sources
- Are My Trees Buried Too Deep? — Penn State Extension
- How to plant a tree — Colorado State Forest Service (CSFS)
- Free the Flare: Maintain Visible Root Flare for Tree Health — Maryland Grows (UMD Extension)
- Root Flare Exposure — Dirt Doctor
Recommended
- Florida Homeowners: Call an Arborist Before Driveway Root Repairs
- 7 Essential Tree Trimming Safety Tips for Homeowners
- Homeowners: 6 Quick Steps to Triage a Tree Crack and Stay Safe
- Top 7 Tree Pruning Tools Comparison 2026