By: Shelby McCullough| Published: August 16, 2026
A conk on a tree is the fungus’s fruiting body, and it almost always means the wood inside that tree is already decaying. That shelf, bracket, or hoof-shaped growth on the trunk or root flare isn’t the disease itself. It’s the visible proof that a wood-decay fungus has been colonizing the tree’s interior, often for years, before you ever noticed anything on the outside. University extension research treats conks as one of the most reliable field signs of internal rot, and that rot can compromise the wood’s structural strength long before the canopy shows any stress.
Here’s what to do in the next fifteen minutes if you just spotted one:
- Photograph it from a few angles, including a wide shot for context and a close-up of the underside surface.
- Keep people and pets away from the area directly under the canopy until someone qualified has looked at it.
- Note anything nearby that could be damaged if the tree or a limb came down: your house, a fence, a parked car, a play set.
- Call an ISA-certified arborist for a risk assessment rather than waiting to see if the tree “looks fine” next season.
That last step matters more than people think. Extension guidance points out that conks frequently show up only after decay is well established, so a tree with a full green canopy and one small mushroom-like growth near the base isn’t automatically low risk.
Key Takeaways
Conks on a tree are reproductive fungal structures that signal internal wood decay, and that decay can weaken a tree’s structural integrity long before the canopy shows any sign of trouble.
| Point | Details |
|---|---|
| Conks signal internal decay | A conk on a living tree is the fungus’s fruiting body and almost always points to rot happening inside the wood. |
| Strength loss outpaces weight loss | A 10% loss of wood weight can cause a 70 to 90 percent drop in wood strength, so small-looking decay can carry big risk. |
| Restrict access and call a professional | Keep people clear of the canopy and get an ISA-certified arborist assessment when conks appear near structures or people. |
| No cure exists for internal rot | There is no curative fungicide for established wood decay; management means hazard mitigation, not treatment. |
| Prevention beats reaction | Proper pruning, wound avoidance, and routine inspections through services like those from McCullough Tree Service reduce future infection risk. |
Where to Read More
These sources back the identification and risk guidance covered above, and they’re worth bookmarking if you want to dig deeper into the science behind wood decay.
- UC Statewide IPM Program on wood decay fungi covers the biology of decay fungi and why fungicides don’t cure established rot.
- UMass Extension’s fact sheet on Ganoderma applanatum details artist’s conk identification and the diagnostic tools arborists use.
- Missouri Botanical Garden’s guide to Ganoderma root rot explains how conks form and what they mean for tree decline.
- Georgia Trees’ fact sheet on fungal conks breaks down common entry wounds and prevention basics.
- Foundation ResQ’s guide to wood rot signs is a useful cross-reference if you’re also concerned about rot near your home’s foundation.
Table of Contents
- How to Identify Conks on a Tree
- What Causes Conks and Wood Decay to Form?
- Common Fungi That Form Conks on Trees
- What Do Conks Mean for Tree Safety?
- How Do Arborists Test for Internal Decay?
- Managing a Tree With Conks: Your Real Options
- How Fast Does Tree Decay Progress, and What Does It Cost?
- When Should You Call an Arborist, and What Should You Ask?
- How to Prevent Future Fungal Infections on Trees
- Sources
How to Identify Conks on a Tree
A conk looks like a shelf, bracket, or sometimes a rounded hoof stuck to the bark, and it can be woody and hard or soft and rubbery depending on the species and its age. The surface facing up is usually the cap, often banded in browns, grays, or tans. The underside is where the action happens: pores, gills, or a maze-like surface that releases spores. That underside texture is one of the fastest ways to tell a decay fungus from something harmless growing nearby.
When you’re documenting one for an arborist, a handful of photos does more good than a dozen phone calls describing it. Take a wide shot that shows the conk’s position on the trunk relative to the ground and any nearby structures. Get a close-up of the top surface and, carefully, the underside pores or gills. Photograph the root flare and base of the tree even if the conk is higher up, since decay often extends well beyond where the fruiting body appears. Set a coin, a ruler, or your shoe next to it for scale. Those four angles are usually enough for a professional to form an initial opinion before ever stepping on your property.
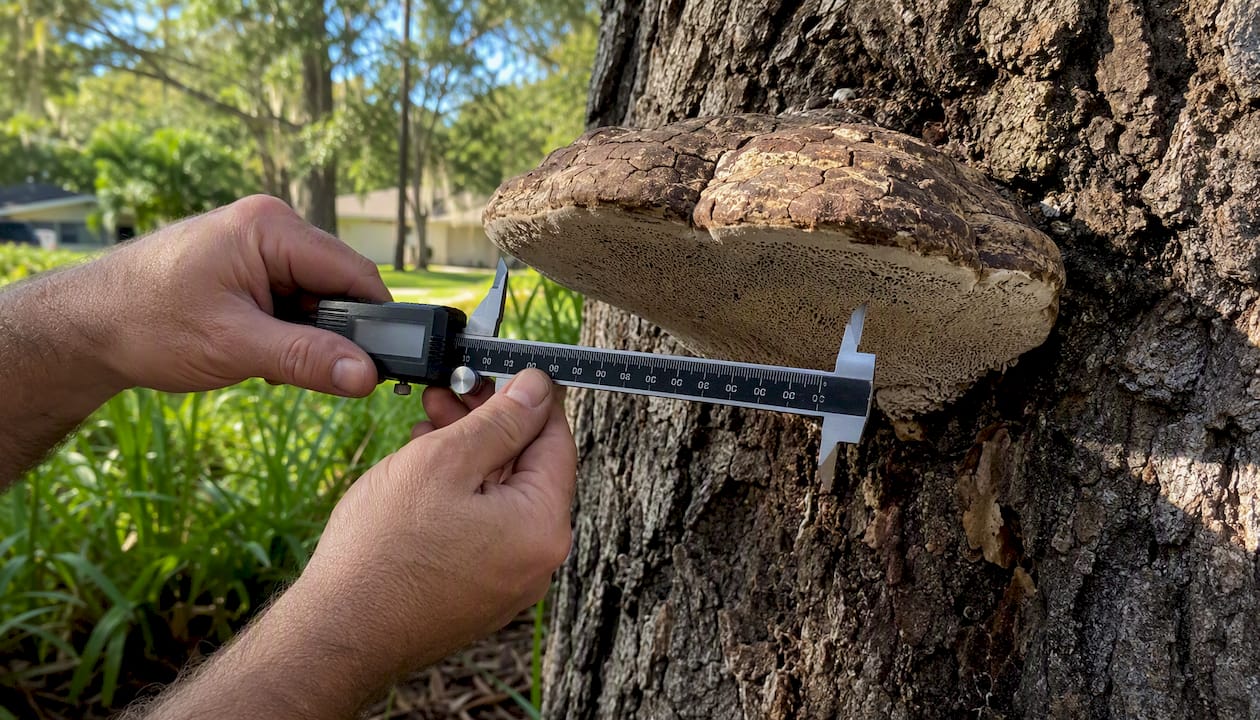
Not every growth on bark is a threat. Lichens form flat, crusty, or leafy patches in green, gray, or orange and they don’t have pores or gills. Moss is soft and green. Old pruning wounds sometimes callus into shapes that look vaguely shelf-like but lack the layered, fibrous structure of a true conk. If you’re not sure which you’re looking at, the safest move is to treat it as a conk until an arborist tells you otherwise.
One safety note: don’t climb, lean a ladder against a decaying limb, or crawl under a canopy with visible dead wood overhead just to get a better photo. Stand back, use zoom, and let a professional get close with the right equipment.
What Causes Conks and Wood Decay to Form?
Conks form when a wood-decay fungus has already colonized the tree’s internal wood and is ready to reproduce. By the time you see the fruiting body on the outside, the fungus has typically been feeding on the wood’s cellulose or lignin inside the trunk or roots for a considerable stretch of time.
The fungus has to get in somehow, and it almost always exploits damage the tree already has:
- Pruning wounds, especially flush cuts that remove the branch collar
- Lawn equipment strikes and mower damage at the trunk base
- Broken or torn branches from storms
- Construction damage to roots or bark
- Root grafts connecting a healthy tree to an infected neighbor or old stump
Extension fact sheets note that decay fungi commonly enter through mechanical wounds like these, and once the mycelium takes hold, it steadily weakens the wood’s structural integrity from the inside out.
Some trees are simply more exposed to risk than others. Older trees have had more time to accumulate wounds and more years for slow-growing fungi to establish. Trees stressed by soil compaction, poor drainage, or repeated root disturbance have weaker natural defenses. Certain species are more susceptible to particular decay fungi than others, and a tree planted on a poor site, too wet, too compacted, too shallow, starts at a disadvantage before any wound even happens.
This is why a lush, green crown doesn’t tell the whole story. A tree can be actively photosynthesizing and putting out new growth while its interior is hollowing out. Conks often don’t appear until the decay column is already substantial, which is exactly why extension programs treat their appearance as a call to action rather than a wait-and-see situation.
Common Fungi That Form Conks on Trees
A small number of genera account for most of the conks homeowners run into in yards and along property lines. Knowing which one you’re looking at helps gauge urgency, even though every conk on a living tree deserves professional attention.
Ganoderma applanatum, known as artist’s conk, produces flat, semicircular brackets that are typically brown on top with a white to pale underside that darkens when scratched, which is where the “artist’s” nickname comes from. It usually appears at the base of the trunk or on exposed roots and causes white rot. According to UMass Extension, the decay column associated with a single conk can extend several feet above and below where it’s fruiting, which is why a basal Ganoderma conk is one of the more serious signs a homeowner can encounter.
Trametes versicolor, or turkey tail, is easy to recognize by its thin, fan-shaped caps banded in shades of brown, gray, blue, and cream, layered together like feathers. It usually shows up on dead branches, stumps, or already-dead sections of wood rather than aggressively attacking healthy living tissue, though it’s still worth noting when you see it on a living tree’s dead limbs.
Laetiporus sulphureus, commonly called sulphur shelf or chicken-of-the-woods, forms bright orange to yellow, fan-shaped clusters that are hard to miss against dark bark. It causes brown rot, typically in oaks and other hardwoods, and tends to appear on wounds or dead sections of an otherwise living trunk.
Armillaria species, root rot or honey fungus, behaves differently from the others. Instead of prominent brackets, it often shows up as small honey-colored mushroom clusters at the base of the tree, sometimes accompanied by white fungal mats under the bark near the roots. It attacks the root system directly, which makes it one of the harder threats to catch early since the visible signs are subtle and easy to miss during a quick yard walk.
A quick warning worth repeating: never eat a bracket fungus you find on a tree unless it’s been positively identified by someone qualified. Several toxic species closely resemble edible ones, and misidentification is a real risk, not a theoretical one.
If you’re unsure which species you’re looking at, the same photo set described earlier, whole-trunk context, close-up top and underside, base and root flare, usually gives an arborist enough to make an initial call. Occasionally a physical sample is needed for lab identification, particularly when the growth doesn’t match common patterns.
What Do Conks Mean for Tree Safety?
Conks usually mean the tree has lost meaningful internal strength, and that loss can be severe even when it doesn’t look severe from the ground. This is the part homeowners tend to underestimate: decay doesn’t need to hollow out most of a trunk to become dangerous.
Decay can cause a significant disproportionate loss in wood strength compared to the amount of wood weight lost, according to UC IPM’s pest notes on wood decay fungi. That disproportion is the single most important number in this entire topic. A tree that’s lost a fraction of its wood mass to rot can already be structurally compromised in ways that visual inspection alone won’t catch.
Decay leads to a few predictable failure patterns. Root and butt rot can cause a tree to uproot with surprisingly little wind, since the root plate simply can’t hold anymore. Trunk decay can lead to a snap partway up, often at the exact height where a cavity has hollowed the wood. Limb failure happens when decay travels out into scaffold branches, sometimes only becoming obvious when a heavy limb drops during a storm or even on a calm day.
How urgent is your specific situation? A few factors help you sort it out:
- Location matters. Conks at the base or root flare generally signal more serious structural risk than conks high in the canopy on a single dead branch.
- Quantity matters. Multiple conks, or conks that return year after year in the same spot, point to an established, ongoing infection rather than an isolated event.
- Proximity to targets matters. A tree with a basal conk fifteen feet from your bedroom window needs faster attention than the same tree in the back corner of an empty lot.
- Recent stress matters. Heavy storms, drought, or construction work near the root zone can accelerate failure in an already-weakened tree.
A simple triage helps you decide what to do today versus this month:
- Immediate hazard: conks near the base plus visible cracking, leaning, or root heaving near a structure. Restrict access now and call for an emergency assessment.
- Suspected hazard: conks present but no other obvious symptoms, tree is near a target. Schedule a rapid professional assessment within days, not months.
- Lower immediate risk: an isolated conk on a dead limb, far from anything it could damage. Schedule a routine inspection, and don’t ignore it long term.
Whatever the tier, this isn’t a wait-it-out situation. Our tree inspection services exist precisely because the gap between “looks fine” and “actually fine” is where most tree failures happen.
How Do Arborists Test for Internal Decay?
A qualified assessment starts with a visual and physical inspection, then adds targeted diagnostics only when the situation calls for more precision. Testing tells you how far decay has progressed, not just whether it’s present, and that distinction shapes the whole recommendation an arborist gives you.
Visual inspection comes first every time. An arborist looks at conk location, canopy condition, bark abnormalities, lean, soil heaving, and root flare exposure. It costs nothing extra and rules a lot in or out before any equipment comes out.
Sounding and probing involves tapping the trunk with a mallet and listening for hollow-sounding sections, or gently probing softened areas with a pick. It’s quick and minimally invasive, but it’s a rough screening tool rather than a precise measurement.
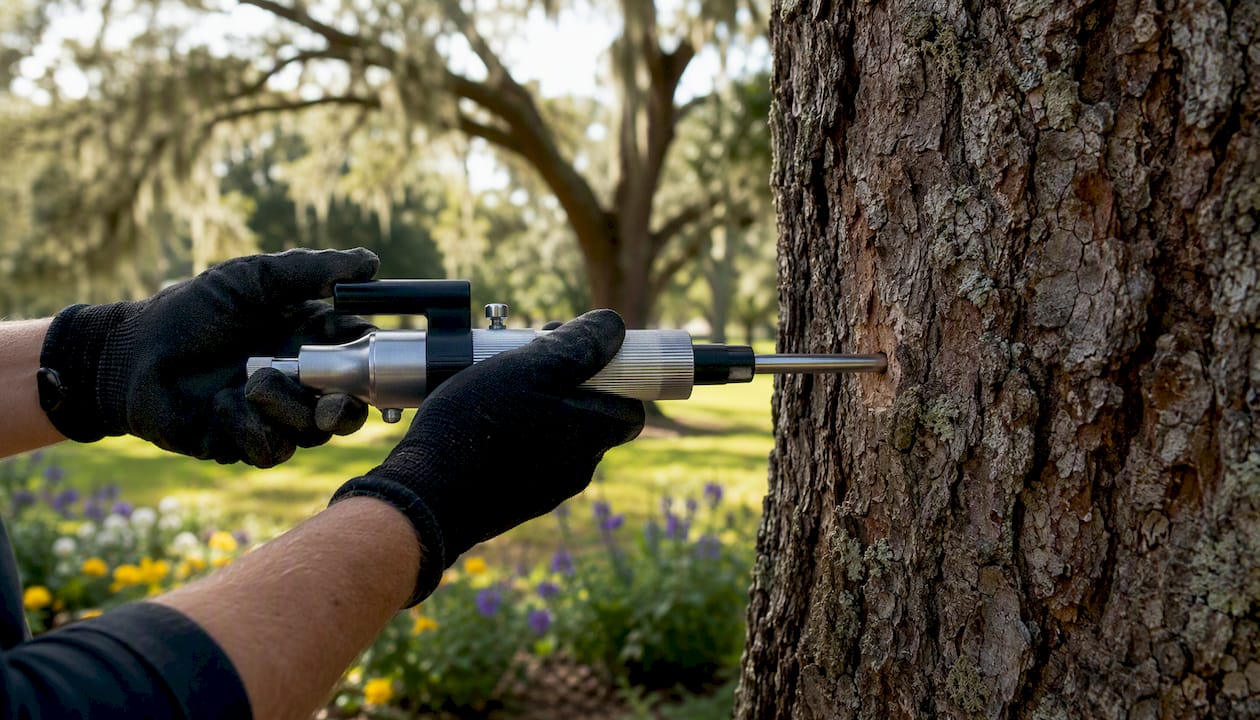
Resistance drilling, often called by the brand name resistograph, drives a thin needle through the wood while recording resistance. Solid wood resists more; decayed or hollow wood resists less. Extension research lists this among the standard tools arborists use to assess internal decay, and it leaves only a small pinhole behind.
Sonic or electrical tomography sends sound waves or electrical current through the trunk from multiple points and builds a cross-sectional image of sound versus decayed wood. It’s more expensive and typically reserved for high-value trees or situations where a removal decision needs solid documentation behind it.
Root collar excavation involves carefully digging around the base to expose the root flare, since a surprising amount of decay and girdling damage hides below grade where nobody looks.
A solid inspection report should give you a summary of findings, a risk rating, recommended next steps, and a suggested timeline, whether that’s “monitor annually” or “remove within thirty days.” Advanced diagnostics cost more and aren’t necessary for every tree. They earn their keep on mature, high-value specimens or any tree positioned where a wrong call has real consequences.
Managing a Tree With Conks: Your Real Options
There’s no fungicide that cures established internal wood decay. Extension programs are direct about this: once decay fungi have colonized heartwood, chemical treatment doesn’t reverse it. Management from here forward is about hazard mitigation, not a cure.
That leaves four practical paths, and choosing between them depends on what you’re protecting and how urgent the situation is.
| Option | When it’s appropriate | Primary goal | Typical urgency and cost shape |
|---|---|---|---|
| Monitoring | Isolated conk, low-value or low-target tree, no diagnostic red flags | Tree preservation | Low urgency; cost is limited to periodic inspection visits |
| Pruning | Decayed or dead limbs identified, trunk and roots otherwise sound | Safety and preservation combined | Moderate urgency; cost scales with limb size and access |
| Bracing or cabling | Structurally weak unions or splits where the tree still has salvageable value | Preservation with safety support | Moderate urgency; cost depends on hardware and canopy size |
| Removal | Basal or multiple conks near targets, or diagnostics confirm advanced decay | Safety | High urgency; cost driven by tree size, access, and disposal |
A single small conk on a low-value tree far from anything it could hurt might reasonably sit under a monitoring plan with annual checkups. A mature oak with perennial Ganoderma conks ringing its base, ten feet from a patio, is a different conversation entirely. That’s a removal candidate, and diagnostics like resistance drilling often help confirm the call before the work is scheduled.
When removal happens, don’t stop at the stump. Ganoderma and similar fungi can persist in root systems and spread through root grafts, so grinding the stump and clearing infected roots before replanting cuts down the inoculum sitting in your soil. Our stump grinding services are built around exactly that goal: clearing the site so a new tree doesn’t inherit the old one’s problem.
If you’re weighing removal against keeping a tree that’s shading your house or property line, our tree removal services team can walk the property with you and lay out what each option realistically involves before you commit to either one.
How Fast Does Tree Decay Progress, and What Does It Cost?
Decay speed varies enormously, which is part of why blanket timelines are unreliable. Some fungi work slowly through dry, well-compartmentalized wood over a span of years. Others move fast in a wet root zone on a stressed tree, sometimes turning into a real structural problem within a single growing season.
A tree in a well-drained yard with a small, isolated conk might sit stable for several years under routine monitoring. A tree with root rot in a compacted, poorly draining spot, especially after a wet season or nearby construction, can go from “looks okay” to “leaning noticeably” much faster. Storms accelerate the timeline for any decayed tree, since wind load is exactly what a weakened root system or hollow trunk struggles to handle.
Costs vary by region, tree size, and access, so treat any number here as a planning range rather than a quote. A basic visual inspection tends to be the least expensive step, often bundled into the first arborist visit. Advanced diagnostics like resistance drilling or tomography cost more because of the specialized equipment and time involved, and they’re typically reserved for trees where the removal decision carries real financial or safety weight. Removal costs climb with tree size, canopy spread, and how close the tree is to structures, since tight access usually means more careful, more time-consuming work. Stump grinding is usually a separate line item, and permits may apply depending on your municipality and the tree’s size or species.
The honest advice here: get a written estimate for your specific tree rather than anchoring to a number you saw online. Access, hazard level, and disposal requirements swing the price more than almost anything else.
When Should You Call an Arborist, and What Should You Ask?
Call a certified arborist as soon as you spot a conk on a tree near people, structures, vehicles, or anything else you’d hate to see damaged. For high-value or mature trees, that call is worth making even before you’re sure the risk is serious, because the diagnostic step is what actually tells you.
Before you hire anyone, run through this checklist:
- Confirm ISA certification. This is the credential that tells you the arborist has been tested on tree biology, risk assessment, and safe practices.
- Ask for a written inspection report with a risk rating, not just a verbal opinion on-site.
- Ask what diagnostic methods they’d use and whether resistance drilling or tomography make sense for your tree.
- Verify insurance and ask for references, especially for any job involving removal near your house.
- Request a written scope and cost estimate before work begins, not after.
Pro Tip: Ask directly, “Will you use a resistograph or sonic tomography, and can you show me photos of the results along with an estimate of how much sound wood remains?” A specific, confident answer to that question tells you a lot about whether you’re dealing with a real professional.
Expect a standard visit to end with a written report, a risk rating, and a recommended timeline, whether that’s scheduling removal, revisiting in a year, or starting a bracing plan. If removal is the recommendation, ask about permit requirements in your area before work is scheduled. Our routine inspection guidance covers how often these checkups make sense for different tree ages and conditions if you’re setting up an ongoing maintenance schedule rather than reacting to a single conk.
How to Prevent Future Fungal Infections on Trees
Prevention comes down to two things: keeping the tree vigorous and avoiding the wounds that let decay fungi in in the first place. Neither requires anything exotic, just consistent, correct habits.
Do this:
- Prune with proper technique, cutting outside the branch collar rather than flush against the trunk.
- Keep the root zone free of compaction, and avoid piling extra soil or mulch against the trunk.
- Water consistently, adjusting for species and season, since drought-stressed trees have weaker natural defenses.
- Remove infected stumps and roots before replanting in the same spot.
Don’t do this:
- Don’t apply wound dressings or sealants after pruning. Extension research is clear that these products don’t speed healing and can trap moisture that actually helps decay fungi settle in.
- Don’t let lawn equipment strike trunks repeatedly; a single deep gouge is an open door.
- Don’t ignore construction work near root zones, since compaction and root severing from excavation are common infection triggers.
- Don’t plant a decay-susceptible species in a poorly drained spot and expect it to shrug off stress.
A seasonal rhythm helps. Prune during the tree’s dormant season where possible, check root zones after major storms or any nearby digging, and don’t skip watering adjustments through hot, dry stretches. If your property has aging trees, an annual professional inspection catches early decay signs long before a conk ever appears, which is a far better position to be in than reacting after the fact. For a broader maintenance framework, our tree health management guide covers the ongoing habits that keep trees resilient year over year.
It’s also worth knowing that decayed roots near a home’s footing aren’t just a tree problem. If you’re dealing with a tree close to your foundation, this guide on tree-related foundation damage is a useful companion read on how root systems and structural risk intersect.
A Note From McCullough Tree Service
We’ve walked enough properties with homeowners pointing nervously at a mushroom-looking growth on a favorite oak to know the instinct is almost always to hope it’s nothing. Sometimes it is. Often it isn’t, and the tree that looks the healthiest from the driveway is occasionally the one hiding the most decay underneath. Our stance is simple: get eyes on it early, get real diagnostics when the situation calls for them, and make the safety call based on evidence rather than optimism. A tree is worth saving when it can be saved safely. It’s not worth the risk when the wood underneath has already lost the strength to hold itself up.
How We Can Help After You Spot a Conk
If you’ve found a conk on your property, the next move is getting someone qualified to look at the whole tree, not just the growth itself. McCullough Tree Service handles the full range this situation calls for: risk assessments, coordination with diagnostic testing like resistance drilling when a tree warrants it, hazardous tree removal, and stump grinding that clears out root inoculum before you replant.
A first visit typically starts with a walk-around, a look at the conk’s location and any other stress signs, and a straightforward conversation about whether monitoring, pruning, or removal makes sense for your specific tree. We won’t push removal on a tree that doesn’t need it, and we won’t tell you to wait on one that does. If you’re ready to get a professional opinion instead of guessing from the driveway, request a tree trimming or removal estimate and we’ll get a certified arborist out to take a real look.
Sources
- UC Statewide IPM Program — Wood decay fungi in landscape trees
- UMass CAFE — Root and trunk rot caused by Ganoderma applanatum (artist’s conk)
- Missouri Botanical Garden — Ganoderma root
Recommended
- Signs of Unhealthy Trees: What Every Florida Owner Should Know
- Why Assess Storm Damage to Trees: A Homeowner’s Guide
- Neighbor’s Tree Liability: Know Your Responsibilities